

Connect Sanity
Sanity setup
Create a private dataset, import the example pages, and edit them in Studio.
Sanity stores your content separately from the website. Content Lake is its hosted content database; Studio is the editor your team uses to write and publish.
Before you switch
Your handbook should already work with CONTENT_SOURCE=local. Keep it that way while you create your Sanity account, add credentials, and import the files. A token gives the setup scripts access to your project; it does not change what the website reads.
Follow the order below. Create your own project, import the local content, check the document counts, then set CONTENT_SOURCE=sanity and restart the website. Your clone does not connect to the video's Sanity project or contain its credentials.
Why add Sanity
Suppose Operations changes the expense policy. In the local-file version, someone edits Markdown in the repository and ships the changed website. With Sanity, the policy owner opens Studio, changes the allowance, and publishes. Refreshing the handbook shows the new amount. A developer does not need to rebuild or redeploy the website for that content edit.
| What changes | How you update it |
|---|---|
| Policy text, a person's responsibilities, or a page owner | Publish in Studio or through an authorized agent |
| Homepage layout, styling, or department definitions | Change the repository and redeploy the website |
| Fields available in the editor | Change the schema and redeploy Studio; update website code if needed |
This example fetches published content on each request. Other websites may need cache revalidation after publishing. The separation between content and code is what lets a team maintain this handbook themselves.
Sanity also maintains semantic search over the same documents. You choose the fields to search; Sanity handles their embeddings and updates. The search lesson explains that part.
Learn on the trial
You can follow the Sanity part for free during the Growth trial, within its included usage limits. New projects automatically receive the trial. It adds Growth features with Free-plan usage limits; check your project's Plan tab in Manage for its current status and trial end date.
You can try it without adding a credit card. If you do nothing, Sanity automatically moves your project to Free when the trial ends. You do not need to cancel the trial to avoid a paid subscription.
This applies to the Growth trial. Choosing paid Growth is a separate upgrade that requires payment details. Sanity says you will not be charged unless you upgrade. See the Growth trial guide.
Pricing in brief
| Plan | Price | What matters for this tutorial |
|---|---|---|
| Free | $0 | Public datasets and 500 semantic searches per month |
| Growth trial | Free for a limited period | Private datasets, with Free-plan usage limits |
| Growth | $15 per billable seat per month | Private datasets and 1,000 semantic searches per month; extra searches cost $1.50 per 1,000 |
A seat is a person collaborating in Sanity. Viewer-role members are free. Handbook visitors and the 10 fictional employee documents do not count as paid seats. These figures were checked on 12 September 2026; use Sanity's pricing page for current prices and quotas.
Dataset Embeddings is available on every plan. Generating and updating embeddings is included; semantic queries use your organization's monthly search allowance.
Plans also include storage, API, and bandwidth allowances. Free and trial plans have hard usage caps; paid Growth can charge overages for resources that allow them. You can monitor usage in Manage. Billing details.
Use the Growth trial for this example because the setup script creates a private dataset. The earlier local-file stages need no Sanity subscription, and the optional OpenAI chat has separate API costs.
Use the fictional content while learning. Sanity says private datasets become public when a Growth trial ends and the project downgrades to Free. Before adding real internal material, arrange continued private-dataset access. The website password does not protect a public Sanity dataset. Trial expiry details.
What we store
Yes, the full policy text lives in Sanity once you switch modes. This demo imports two document types, defined in sanity/schema.ts. A schema describes the fields that the editor shows and the content each document can hold.
| Document type | What it stores |
|---|---|
knowledgePage (18 documents) | Title, description, URL path, department, sidebar order, review date, full Markdown body, and an owner reference |
employee (10 documents) | Name, profile path, role, department, bio, responsibilities, and review date |
An owner reference connects a policy to an employee. Travel expenses points to Sofia de Vries's profile, so the website can show her current name and link to her responsibilities.
Sanity also generates embeddings from selected page and employee fields. Embeddings represent meaning so a question such as "Who handles payment terms?" can find relevant content even when the words differ.
What stays in the app
The homepage copy and layout, department definitions, sidebar components, CSS, and avatar SVGs stay in the repository. Sanity supplies the published content that fills those components. Adding a new department still needs a code change to lib/company.ts and the department choices in sanity/schema.ts.
Chat history stays in the browser's localStorage. OpenAI writes chat answers using content retrieved from Sanity. Neither Studio nor Content Lake runs the website or stores the chat history in this example.
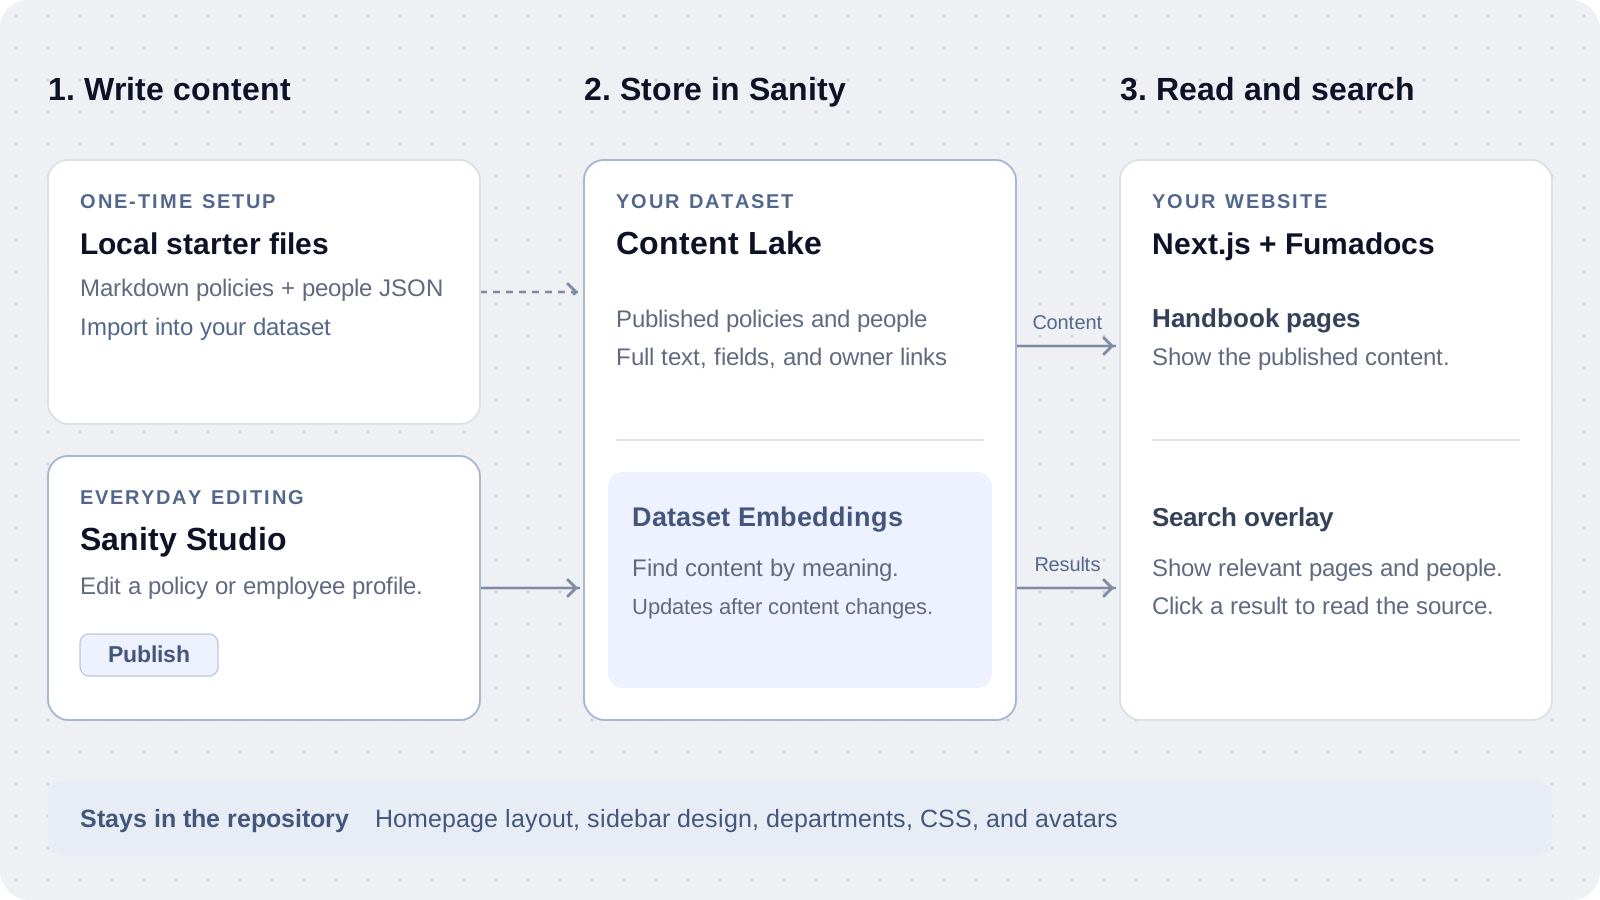
The dashed arrow is the initial import. After that, use Studio or a connected agent to publish changes. The website reads published content from Sanity, and search uses its embeddings to find relevant pages and people.
For now, get one published edit onto the website. The later pages cover people and search.
Create your account
Create a project
Open Sanity's account setup and create your account. In Manage, create a project named Company Knowledge Base. Copy the project ID from its settings.
Open the project's Plan tab and confirm the Growth trial is active before creating the private dataset. You do not need to generate another starter app; this repository already contains the website and Studio configuration.
Create an API token
In Manage, open your project, then API > Tokens > Add API token. Name it Handbook setup agent and select Developer, which Sanity labels "Recommended for agents". Click Add token and copy the value into .env when it appears.
Use a dedicated project API token, also called a robot token, for the scripts your coding agent runs. The agent needs permission to create the dataset and configure embeddings as well as import content. Editor can edit content but cannot create a new dataset. See Sanity's roles.
This is a permission choice, not a separate AI API key. Once setup is complete, a Viewer token is enough for the website's read-only content and search requests. Keep the Developer token for setup tasks outside the deployed app.
SITE_PASSWORD=your-existing-password
CONTENT_SOURCE=local
SANITY_STUDIO_PROJECT_ID=your-project-id
SANITY_STUDIO_DATASET=knowledge
SANITY_API_KEY=your-developer-token
SANITY_API_VERSION=2025-02-19
Sanity shows the secret only once. Store it in .env; ask your coding agent to use that environment variable without printing its value. Keep it out of chat messages, screenshots, and Git. See Sanity's token guide.
Create and import
npm run sanity:setup
npm run sanity:import
npm run sanity:status
Setup creates the private knowledge dataset and enables embeddings. Import copies the local files into 18 published page documents and 10 employee profiles, then adds missing owner references. Check those counts with npm run sanity:status before switching the website.
The first import includes any edits you made to the local files. It is a one-time starting copy, not a background sync. Running import again creates missing IDs and owner references but leaves existing page and profile content unchanged.
If you already have a public dataset with this name, choose a new name. The setup script refuses to change its visibility.
Find your database
In Sanity, a dataset is the closest equivalent to a database. It contains documents, including our policies and people. Follow this path in Manage.
- Open your Company Knowledge Base project.
- Select Datasets, then
knowledge. - Check that its visibility is Private. After the import, the example has 28 content documents, consisting of 18 pages and 10 people. Drafts created later can increase the displayed count.
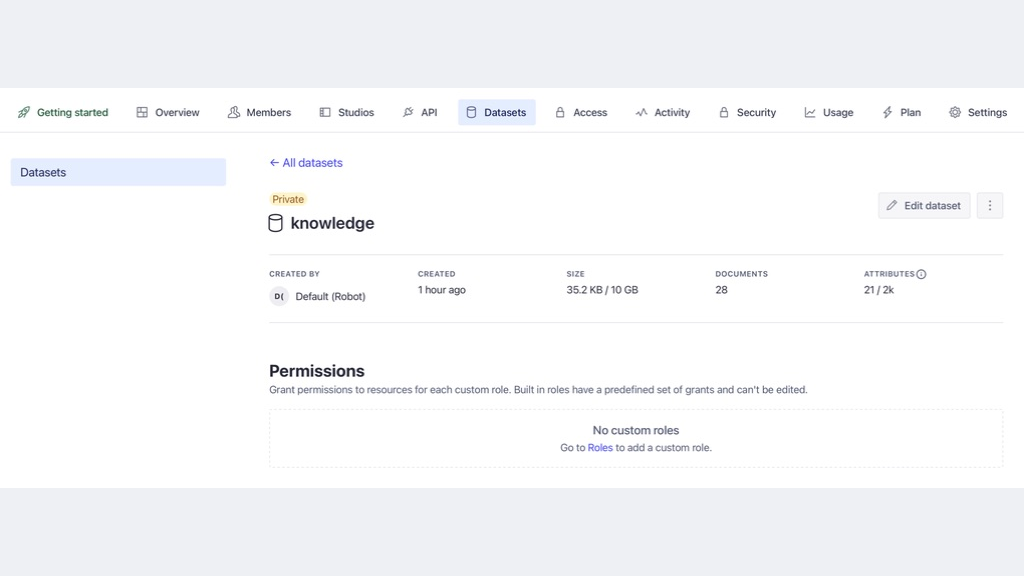
The dataset screen shows settings and counts. To browse the actual documents and edit their fields, open Studio using the instructions below. Sanity's dataset guide explains how datasets hold related documents.
| Place | What you use it for |
|---|---|
| Manage | Project settings, API tokens, dataset visibility, usage, and billing |
| Studio, locally or hosted by Sanity | Browse and edit Knowledge page and Employee documents |
Handbook at localhost:3000 | Read the published content and use search or chat |
The Studios tab in Manage lists deployed editors. It can be empty while you run Studio locally, even though your content is already in Content Lake. Deploy Studio below to give your team an editing URL.
Switch the website
CONTENT_SOURCE=sanityStop the website with Ctrl+C, then restart npm run dev. A restart makes the server read the changed environment setting. Sanity now supplies policy and employee content. The app builds the sidebar links from the published page paths, departments, and ordering numbers. The sidebar design still comes from Fumadocs.
Local files remain starter material; editing them no longer changes the website. In this mode, publish content edits through Studio or the Sanity API so pages and search use the same source.
Open the same Travel expenses URL. It should still contain the example policy, now loaded from your dataset. Publish a small change in Studio below and refresh the page to prove the switch worked.
If pages are missing or Sanity reports an error, check the project ID, dataset, token, and import status. Sanity mode does not silently fall back to local files. To return to the local exercise, set CONTENT_SOURCE=local and restart. This shows the original local files; it does not copy Studio edits back into them.
Open Studio
Studio is the editing app. Its forms come from sanity/schema.ts, and it connects to the hosted dataset. Our repository includes Studio alongside the website, so you do not need another repository or Sanity project.
Start it locally to try an edit. In a second terminal, run:
npm run studio
# Open http://localhost:3333
Sign in with the Sanity account that owns the project. If Studio requests a CORS origin, open API settings in Manage and add http://localhost:3333 with credentials enabled. Keep using that exact hostname.
In the Structure tool, open Knowledge page and select Travel expenses. Open Employee to browse the 10 people. The schema in sanity/schema.ts defines the title, summary, path, department, owner, review date, and Markdown body. The body is a text field in this lean demo; a visual rich-text editor is a possible extension.
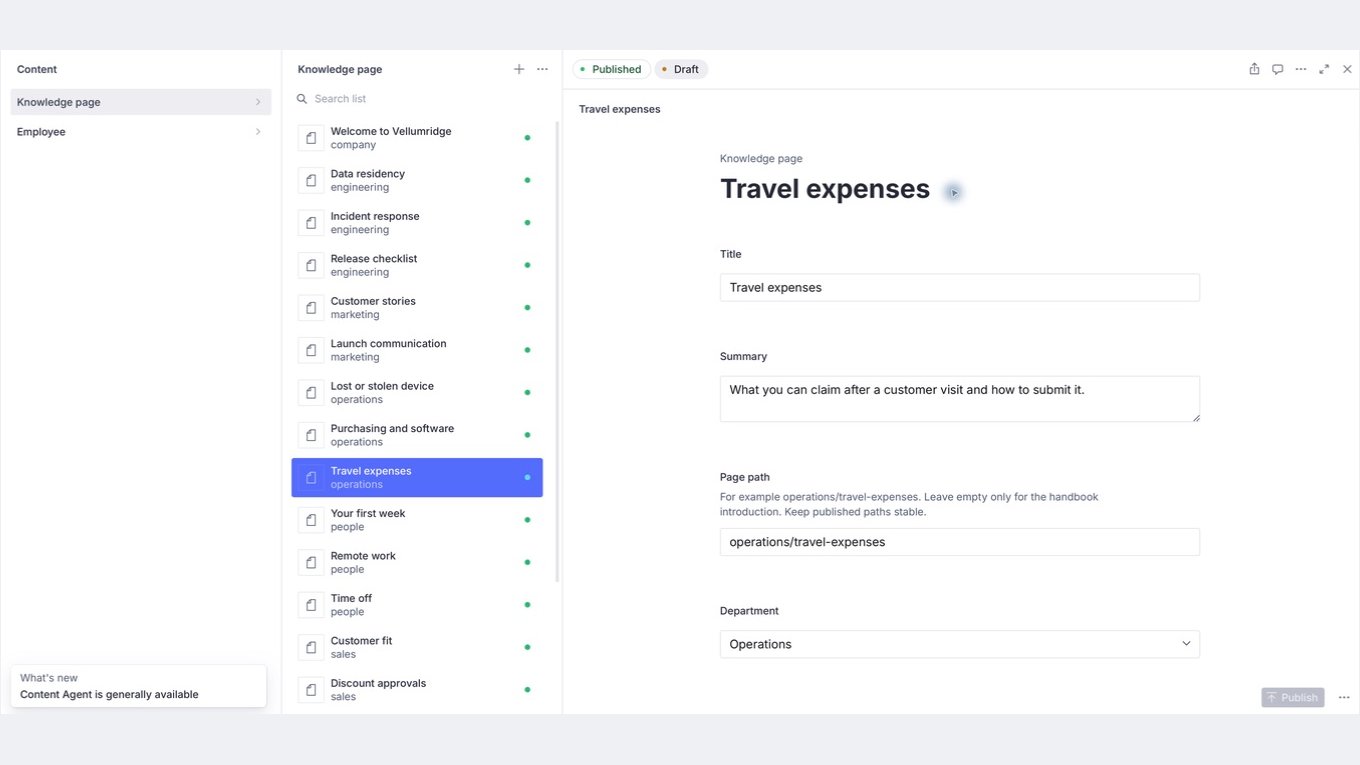
The left columns let you choose a document type and a record. The form on the right shows its stored fields. Scroll down to find Owner profile and Page content (Markdown).
Make a small edit and click Publish. Refresh the matching website page. Drafts stay out of both the website and its search results.
Host the editor
For everyday editing, let Sanity host Studio. From this repository, run:
npx sanity login
npx sanity deploy
Sign in with the account that owns your project and choose an available hostname. The command builds the editor, deploys its schema, and returns an address such as your-handbook.sanity.studio. It also adds the editor to your project's Studios tab in Manage. The address can open inside Sanity's dashboard. See Studio hosting.
Bookmark your own returned URL. Local and hosted Studio both edit the same dataset. Your team can use the hosted editor without a terminal; the handbook website can keep running on localhost during this tutorial.
Run deployment again when you change Studio's schema or configuration. Everyday content edits only need Publish.
Work with colleagues
Invite colleagues through your project's Members section in Manage. Each person signs in with their own Sanity account and works in the shared Studio. On the Growth trial or Growth plan, Editor is a suitable role for someone who should edit and publish content. Role availability depends on your plan. Sanity's roles.
For example, Operations maintains expenses while Sales maintains discount rules. Both use the same editor and see drafts before publication. A policy's Owner profile identifies its contact; it does not restrict who can edit that policy.
Use accounts for people and separate, named API tokens for scripts or agent integrations. An Editor token can maintain content; the broader Developer token used earlier also supports setup tasks. Give the website a Viewer token. Separate tokens can be revoked independently, but naming a token after someone does not turn it into a personal login or limit it to their department. Token permissions.
Edit with an agent
You can start an update in your favorite coding agent and review it in Studio. Sanity's hosted MCP server gives compatible agents tools to read, create, edit, and publish documents. MCP is the connection that lets an agent call those tools. This is optional; the handbook works without it.
- Add
https://mcp.sanity.ioas a remote HTTP MCP server in your agent's settings. - Sign in to Sanity when prompted. OAuth uses your account's permissions; a dedicated API token is an alternative for automation.
- Tell the agent which project and dataset to use, then ask for a draft edit.
Follow the Sanity MCP setup guide for your client. Studio deployment makes the schema available for the agent to inspect. An agent can also use the Sanity API directly with a suitable token.
Try this after connecting, replacing the project ID with your own.
Use Sanity project YOUR_PROJECT_ID and dataset knowledge.
Read the schema and find the Travel expenses policy.
Prepare a draft changing the daily meal allowance from EUR 45 to EUR 50.
Keep the page path, owner, and other policy details unchanged.
Show me the change and leave it unpublished so I can review it in Studio.
Review the draft in Studio and click Publish, or ask the connected agent to publish the reviewed draft. Refresh the handbook to check the result. Keep tokens in your client's secret settings or local environment, outside the prompt and Git.
Sanity Context is a separate, read-only integration. Use the Sanity MCP server above for writing. The handbook's chat panel also only retrieves content and answers questions; it has no editing permissions. Sanity Context.
Checkpoint
A published Studio edit appears on the website. npm run sanity:status reports 18 pages, 10 employees, and enabled embeddings. Newly imported content can still take a little time to appear in semantic results.
Continue to People directory.